Load Balancing Logstash With Amqp
AMQP in Logstash is one of the most complicated parts of the workflow. I’ve taken it on myself, as the person with the most AMQP experience (both RabbitMQ and Qpid) to try and explain as much as need for logstash users.
Patrick DeBois hit me up with a common logstash design pattern that I felt warranted a full detailed post.
Warning: This is an image heavy post. Terminal screenshots are linked to larger versions
Requirements
- No lost messages in transit/due to inputs or outputs.
- Shipper-only configuration on the source
- Worker-based filtering model
- No duplicate messages due to transit mediums (i.e. fanout is inappropriate as all indexers would see the same message)
- External ElasticSearch cluster as final destination
EDIT
Originally our list stated the requirements as No lost messages and No duplicate messages. I’ve amended those with a slight modification to closer reflect the original intent. Please see comment from Jelle Smet here for details. Thanks Jelle!
Notes
We’re going to leave the details of filtering and client-side input up to the imagination.
For this use case we’ll simply use stdin as our starting point. You can modify this as you see fit.
The same goes for filtering. The assumption is that your filters will be correct and not be the source of any messages NOT making it into ElasticSearch.
Each configuration will be explained so don’t stress over it at first glance. We’re also going to explicitly set some options for the sake of easier comprehension.
Client-side agent config
{
  input {
    stdin { debug => true type => "host-agent-input" }
  }
  output {
    amqp {
      name => "logstash-exchange"
      exchange_type => "direct"
      host => "rabbitmq-server"
      key => "logstash-routing-key"
      durable => true
      persistent => true
    }
  }
}
Config Explained
The amqp output:
name
This is the name that will be provided to RabbitMQ for the exchange. By default, the Bunny driver will auto-generate a name. This won’t work in this usecase because the consumers will need a known name. Remember exchanges are for producers. Queues are for consumers. When we wire up the indexer side, we’ll need to know the name of the exchange to perform the binding.
exchange_type
For this particular design, we want to use a direct exchange. It’s the only way we can guarantee that only one copy of a log message will be processed.
key
We’re going to explicitly set the routing key as direct exchanges do not support wildcard routing key bindings. Again, we’ll need this on the consumer side to ensure we get the right messages.
durable
This setting controls if the exchange should survive RabbitMQ restarts or not.
persistent
This is for the messages. Should they be persisted to disk or not?
Note that for a fully “no lost messages scenario” to work in RabbitMQ, you have to jump through some hoops. This is explain more below.
Running the agent
This same configuration should be used on ALL host agents where logs are being read. You can have variation in the inputs. You can have additional outputs however the amqp output stanza above will ensure that all messages will be sent to RabbitMQ.
Indexer agent config
input {
  amqp {
    host => "rabbitmq-server"
    name => "indexer-queue"
    exchange => "logstash-exchange"
    key => "logstash-routing-key"
    exclusive => false
    durable => true
    auto_delete => false
    type => "logstash-indexer-input"
  }
}

filter {
  # your filters here
}

output {
  elasticsearch {
    # your elasticsearch settings here
  }
}
Config explained
The amqp input:
name
This is the name that will be provided to RabbitMQ for the queue. Again, as with exchange, we need a known name. The reason for this is that all of our indexers are going to share a common queue. This will make sense in a moment.
exchange
This should match exactly with the name of the exchange that was created before in the host-side config.
key
This should, again, match the routing key provided in the host-side configuration exactly. direct exchanges do NOT support wildcard routing keys. By providing a routing key, you are creating a binding in RabbitMQ terms. This binding says “I want all messages sent to the logstash-exchange with a routing key of logstash-routing-key to be sent to the queue named indexer-queue.
exclusive
As with the exchange in the host-side config, we’re going to have multiple workers using this queue. This is another AMQP detail. When you bind a queue to an exchange, a channel is created for the messages to flow across. A single queue can have multiple channels. This is how our worker pool is going to operate.
You do not want a different queue name for each worker despite how weird that sounds
If you give each worker its own queue, then you WILL get duplicate messages. It’s counterintuitive, I know. Just trust me. The way to ensure that multiple consumers don’t see the same message is to use mutliple channels on the same queue.
durable
Same as the exchange declarition, this ensures that the queue will stick around if the broker (the RabbitMQ server) restarts.
auto_delete
This is the setting most people miss when trying to ensure no lost messages. By default, RabbitMQ will throw away even durable queues once the last user of the queue disconnects.
type
This is the standard logstash requirement for inputs. They must have a type defined. Arbitrary string.
Sidebar on RabbitMQ message reliability
Simply put, RabbitMQ makes you jump through hoops to ensure that no message is lost. There’s a trifecta of settings that you have to have for it to work:
- Your exchange must be durable with persistent messages
- Your queue must be durable
- Auto-delete must not be disabled
EVEN IF YOU DO ALL THESE THINGS, YOU CAN STILL LOSE MESSAGES!
Order matters
I know … you’re thinking “What the F—?”. There is still a scenario where you can lose messages. It has to do with how you start things up.
- If you start the exchange side but never start the queue side, messages are dropped on the floor
- You can’t start the queue side without first starting the exchange side
While RabbitMQ let’s you predeclare exchanges and queues from the command-line, it normally only creates things when someone asks for it. Since exchanges know nothing about the consumption side of the messages (the queues), creating an exchange with all the right settings does NOT create the queue and thus no binding is ever created.
Conversely, you can’t declare a totally durable queue when there is no exchange in place to bind against.
Follow these rules and you’ll be okay. You only need to do it once:
- Start a producer (the host-side logstash agent)
- Ensure via
rabbitmqctlor the management web interface that the exchange exists - Start one of the consumers (the indexer config)
Once the indexer agent has started, you will be good to go. You can shutdown the indexers and messages will start piling up. You can shut everything down - rabbitmq (with backlogged messages), the indexer agent and the host-side agent. When you start RabbitMQ, the queues, exchanges and messages will all still be there. If you start an indexer agent, it will drain the outstanding messages.
However, if you screw the configuration up you’ll have to delete the exchange and the queue via rabbitmqctl or the management web interface and start over.
How it looks visually
There are two plugins you should install with RabbitMQ:
- rabbitmq_management
- rabbitmq_management_visualizer
The first will provide a web interface (and HTTP API!) listening on port 55672 of your RabbitMQ server. It provides a really easy way to see messages backlogged, declared exchanges/queue and pretty much everything else. Seeing as it also provides a very nice REST api to everything inside the RabbitMQ server, you’ll want it anyway if for nothing but monitoring hooks.
The visualizer is an ad-hoc addon that helps you see the flows through the system. It’s not as pretty as the management web interface proper but it gets the job done.
Starting it all up
Now we can start things up
Producers
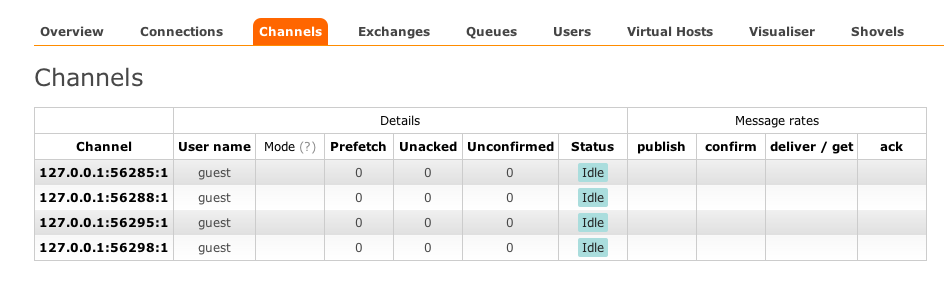
We’re going to start up our four client side agents. These will create the exchange (or alternately connect to the existing one). If you look at the management interface, you’ll see four channels established:
Management view:
Visualizer view:
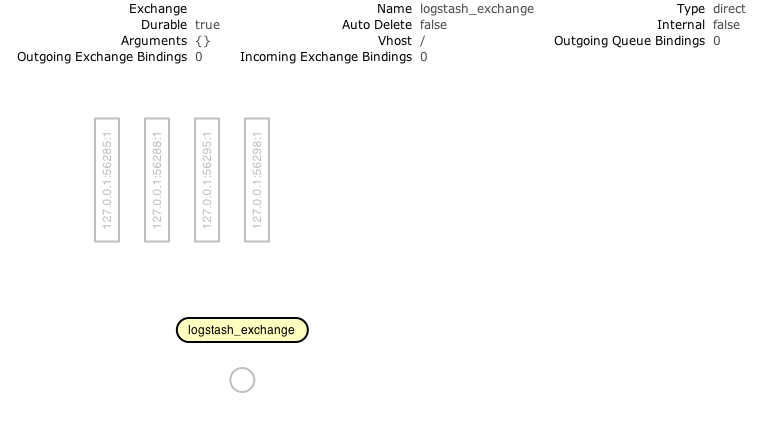
Remember that until we connect with a consumer configuration (the indexer) messages sent to these exchanges WILL be lost.
Consumers
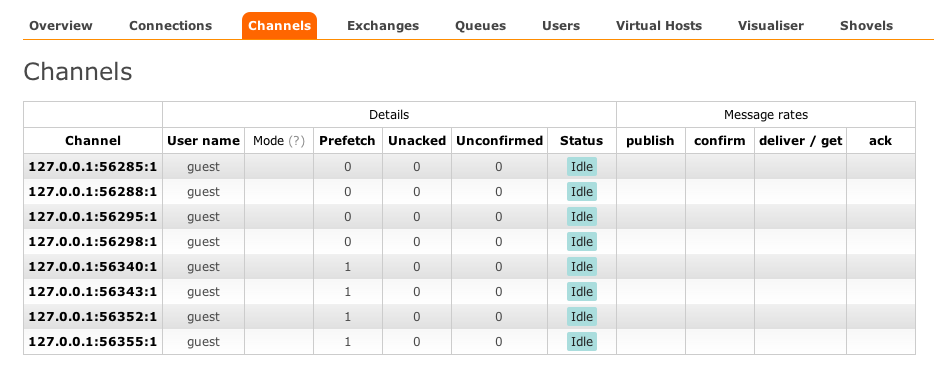
Now we start our indexer configurations - all four of them
Now if we take a peek around the management interface and the visualizer, we start to see some cool stuff.
In the managment interface, you’ll see eight total channels - four for the queue and four for the exchange
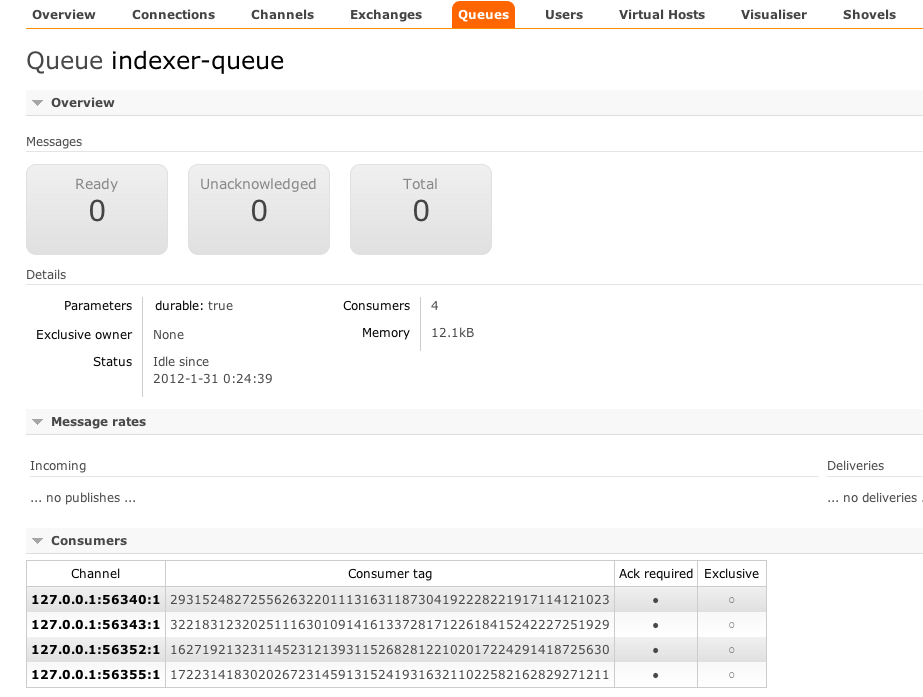
If you click on “Queues” at the top and then on the entry for our indexer-queue, you’ll see more details:
But the real visual is in the visualizer tab. Click on it and then click on the indexer-queue on the far right
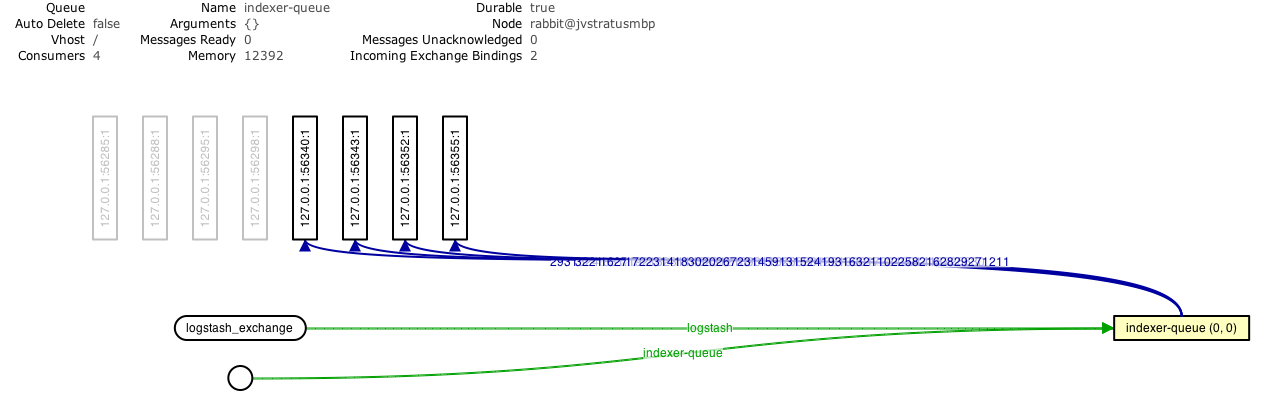
You can see the lines showing the flow of messages.
One thing to make note of about RabbitMQ load balancing. Messages are load balanced across CONSUMERS not QUEUES. There’s a subtle distinction there from RabbitMQ’s semantic point of view.
Testing the message flow
Over in your terminal window, let’s send some test messages. For this test, again, I’m using stdin for my origination and stdout to mimic the ElasticSearch destination.
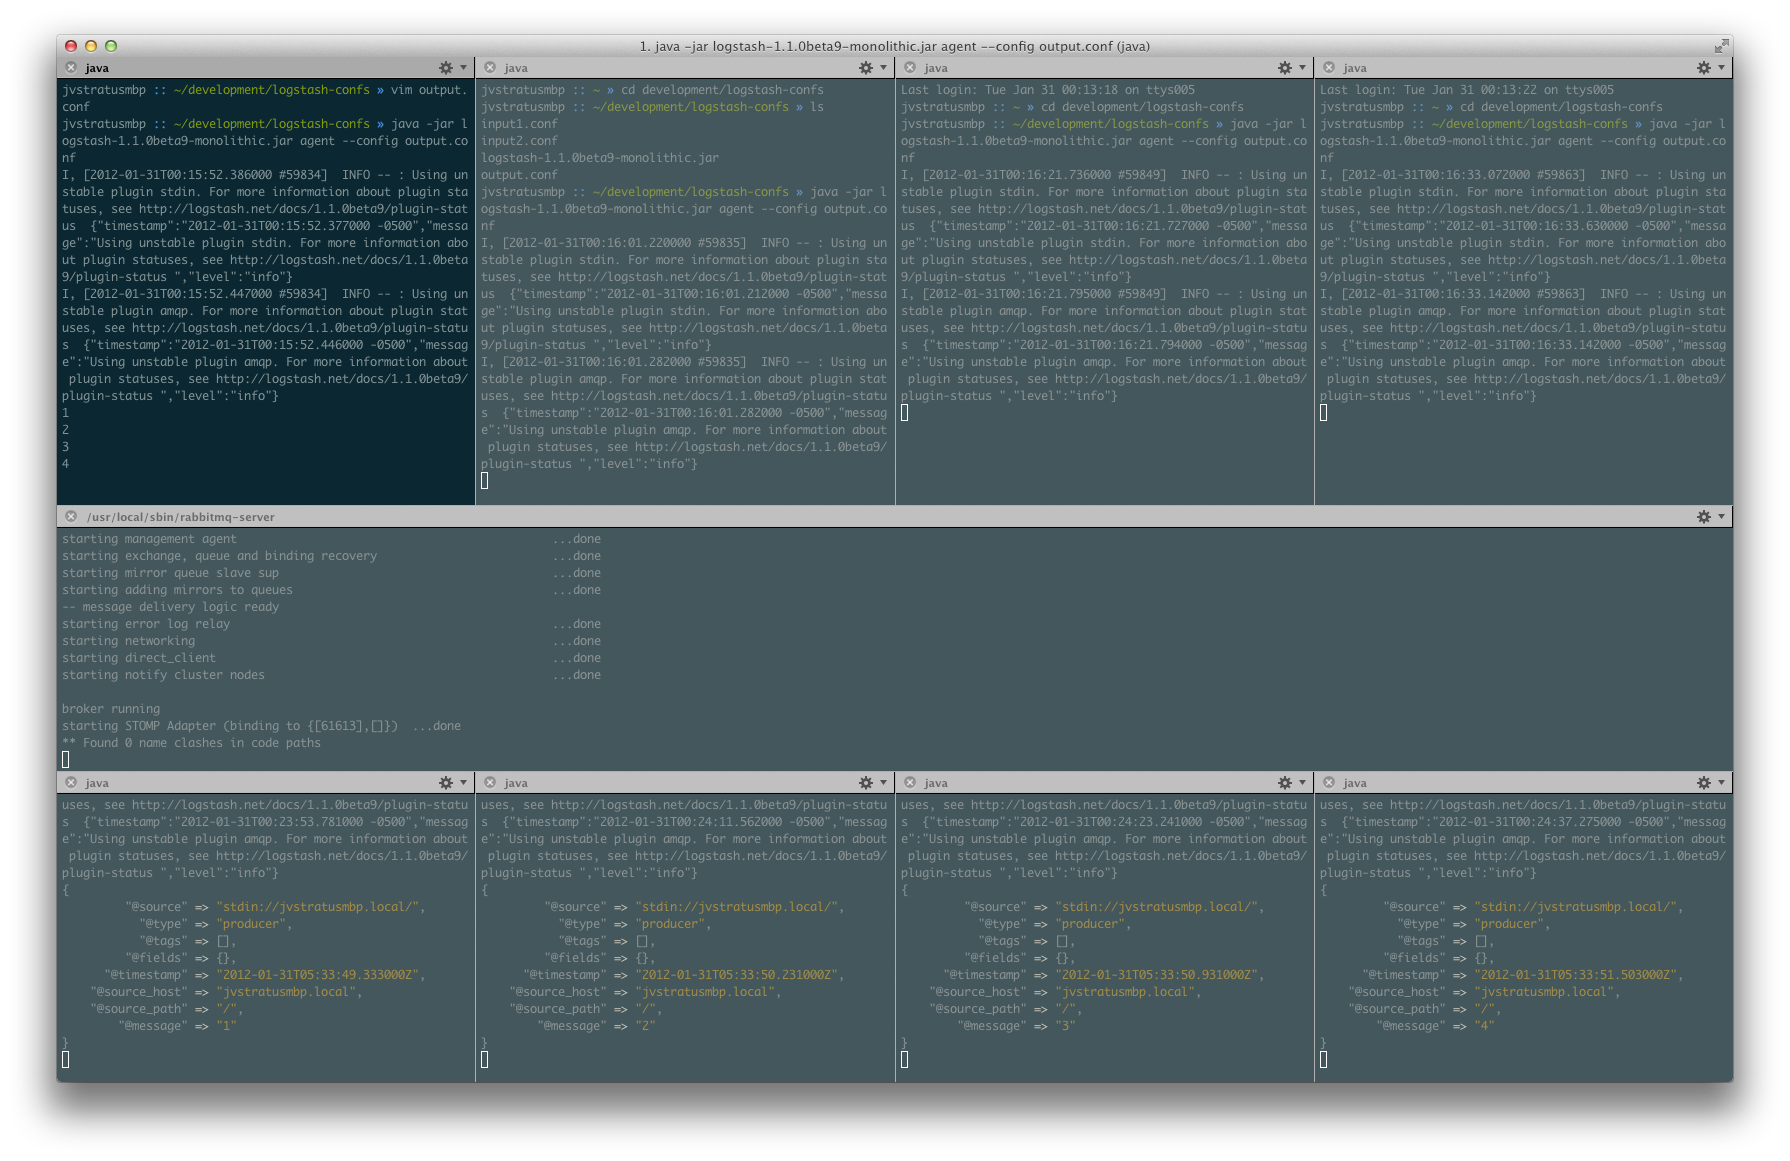
In my first input window, I’m going just type 1 through 4 with a newline after each. This should result in each consumer getting a message round-robin style:
Now I’m going to cycle through the input windows and send a single message from each:
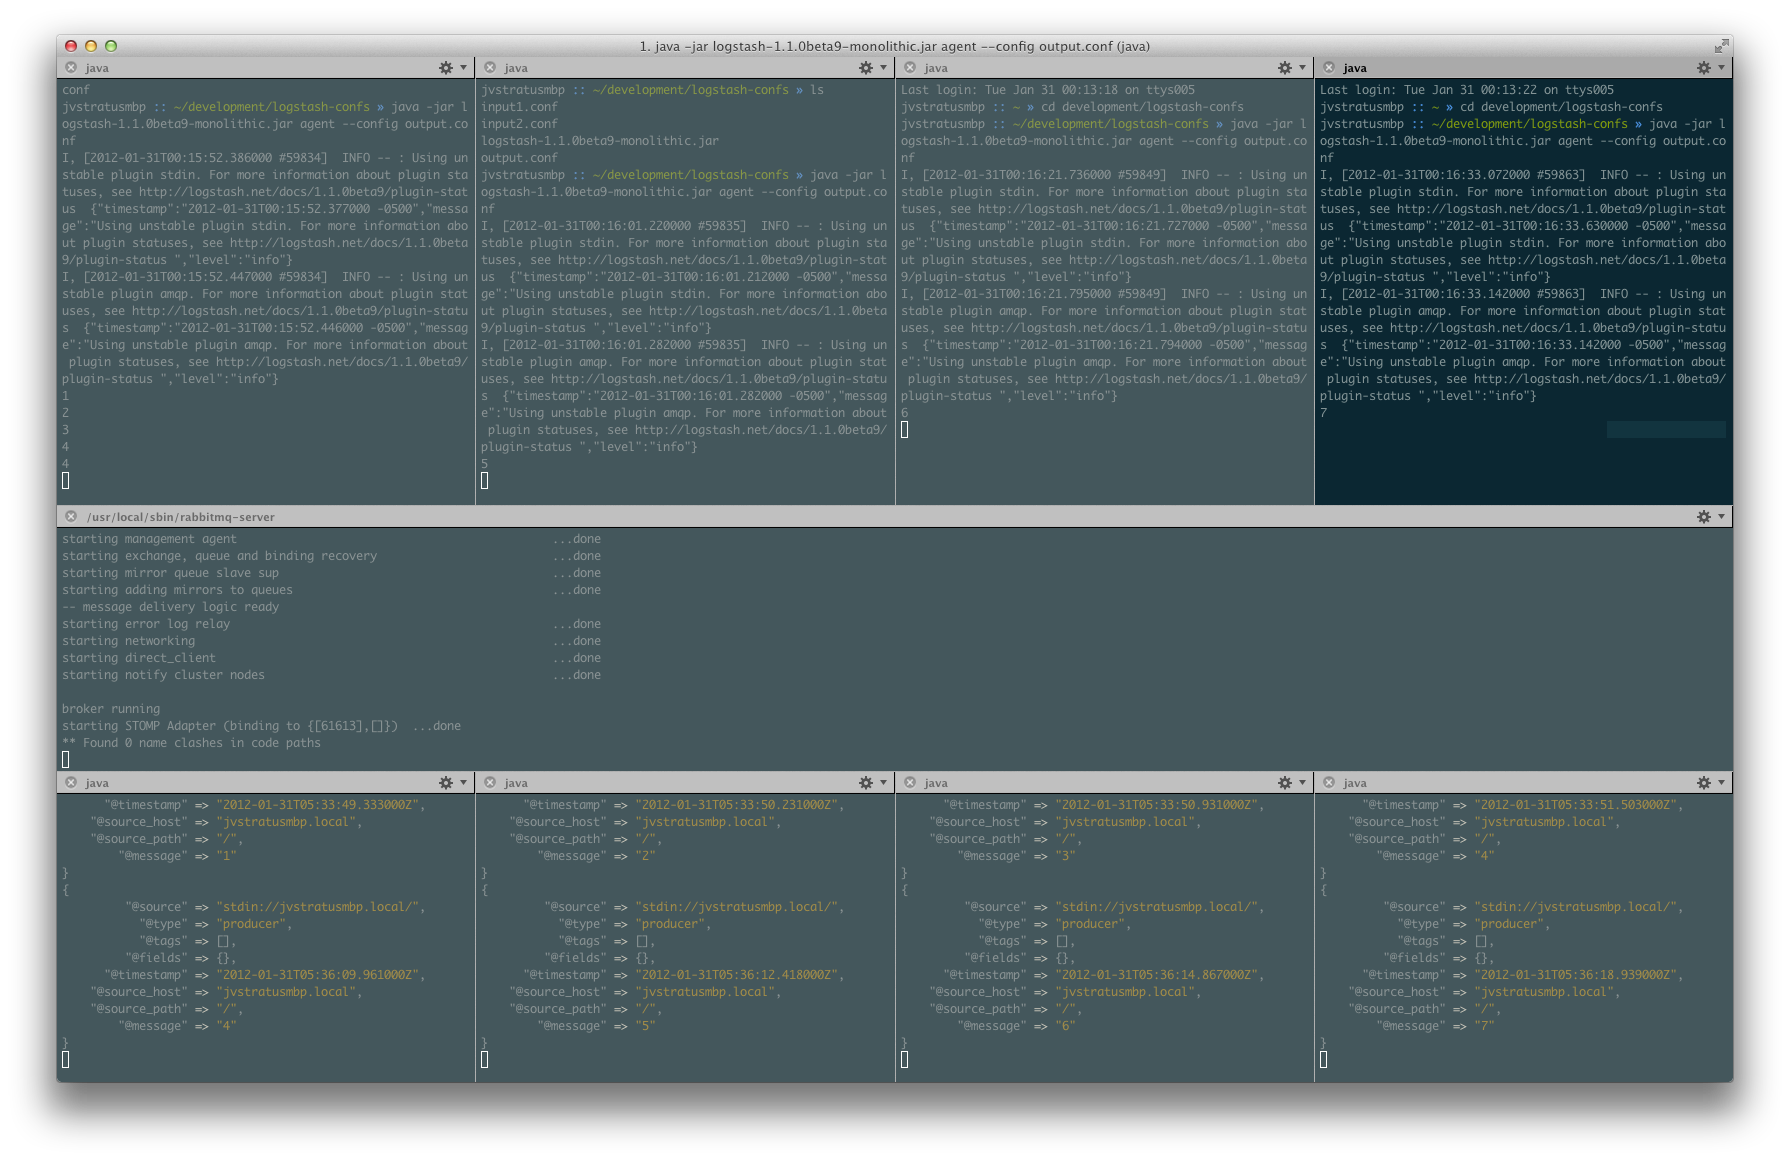
You can see that messages 4-7 were sent round-robin style.
Testing persistence
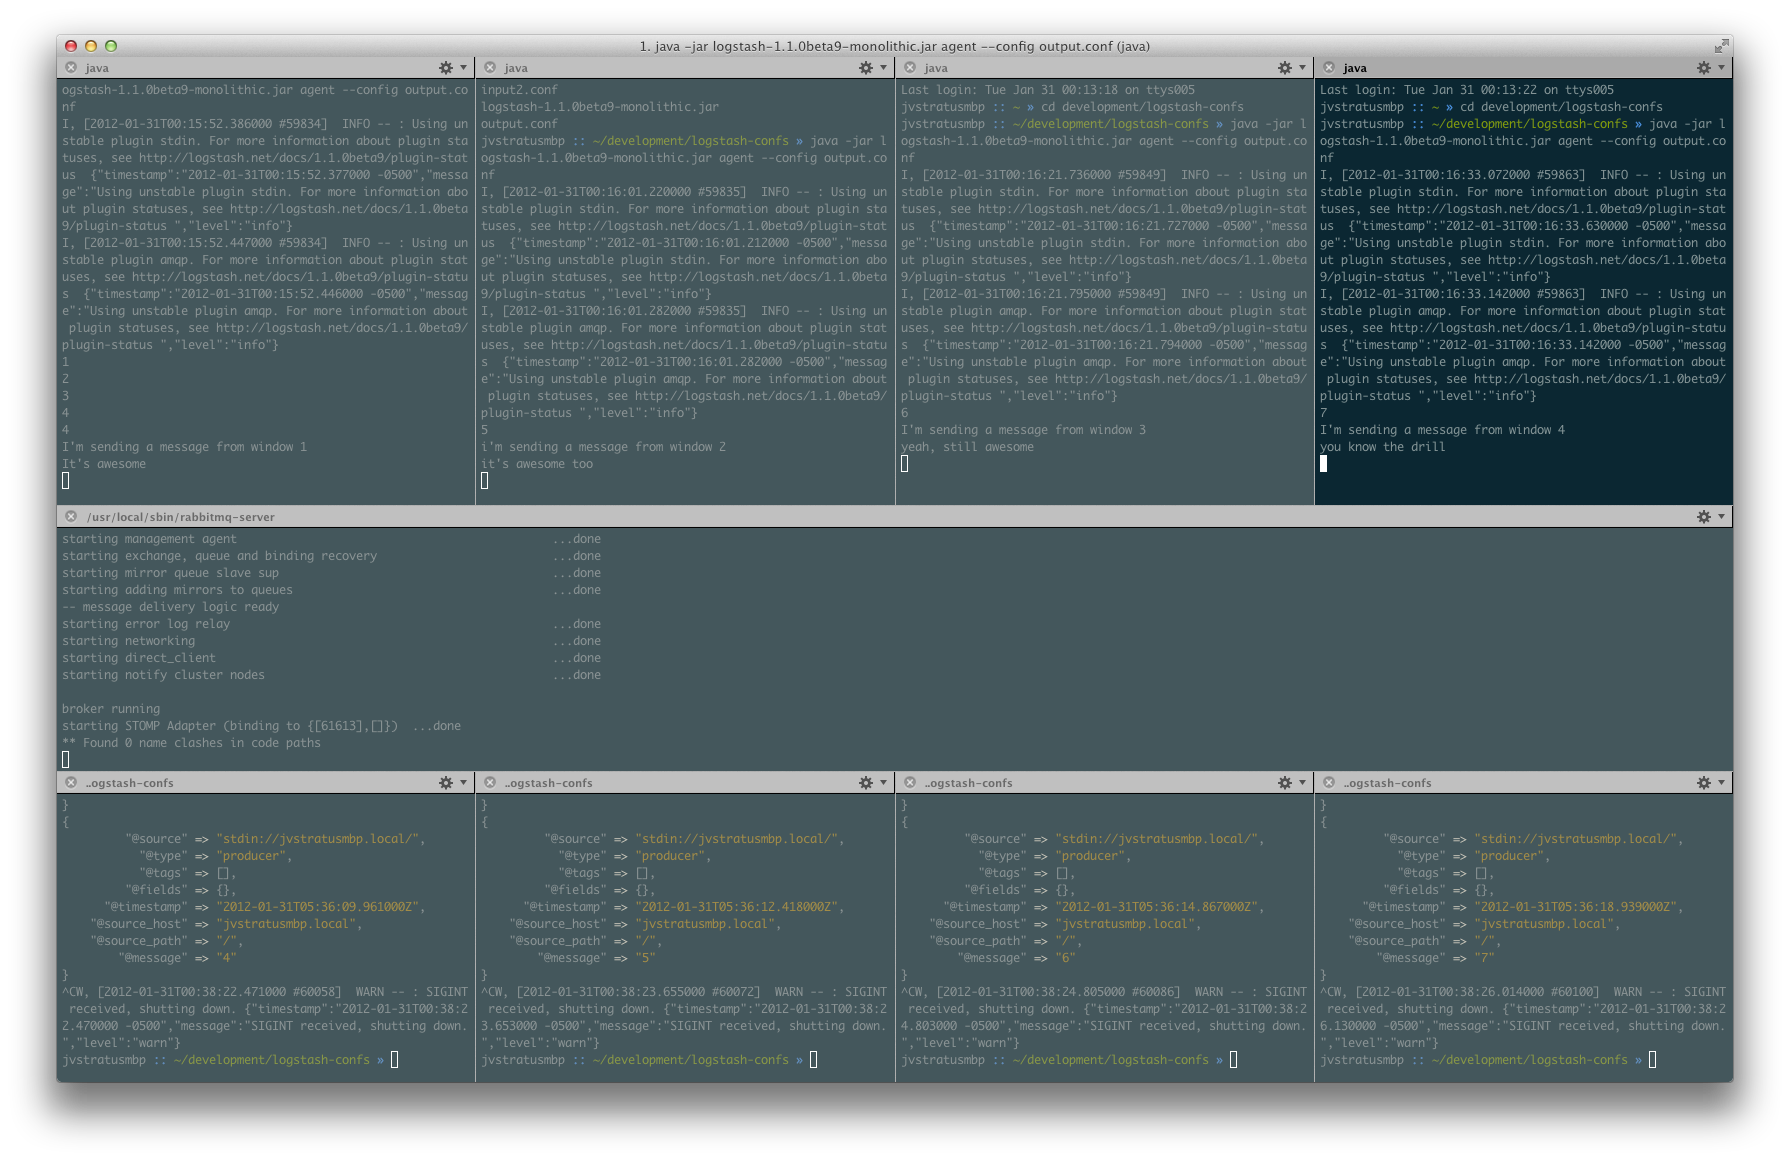
All of this is for naught if we lose messages because our workers are offline. Let’s shutdown all of our workers and send a bunch of messages from each input window:
We sent two lines of text per window. This amounts to eight log messages that should be queued up for us. Let’s check the management interface:
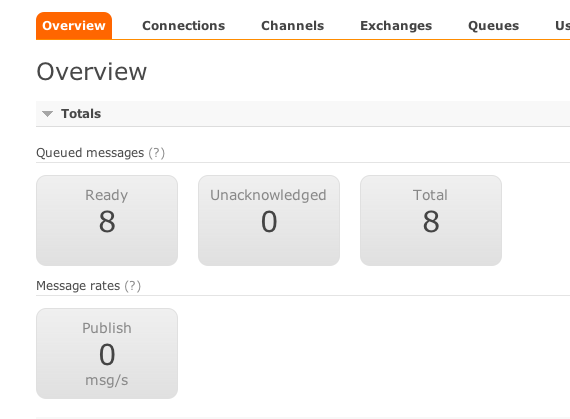
Now if we stop rabbitmq entirely and restart it, those messages should still be there (along with the queue and exchanges we created).
Once you’ve verified that, start one of the workers back up. When it comes fully online, it should drain all of the messages from the exchange:
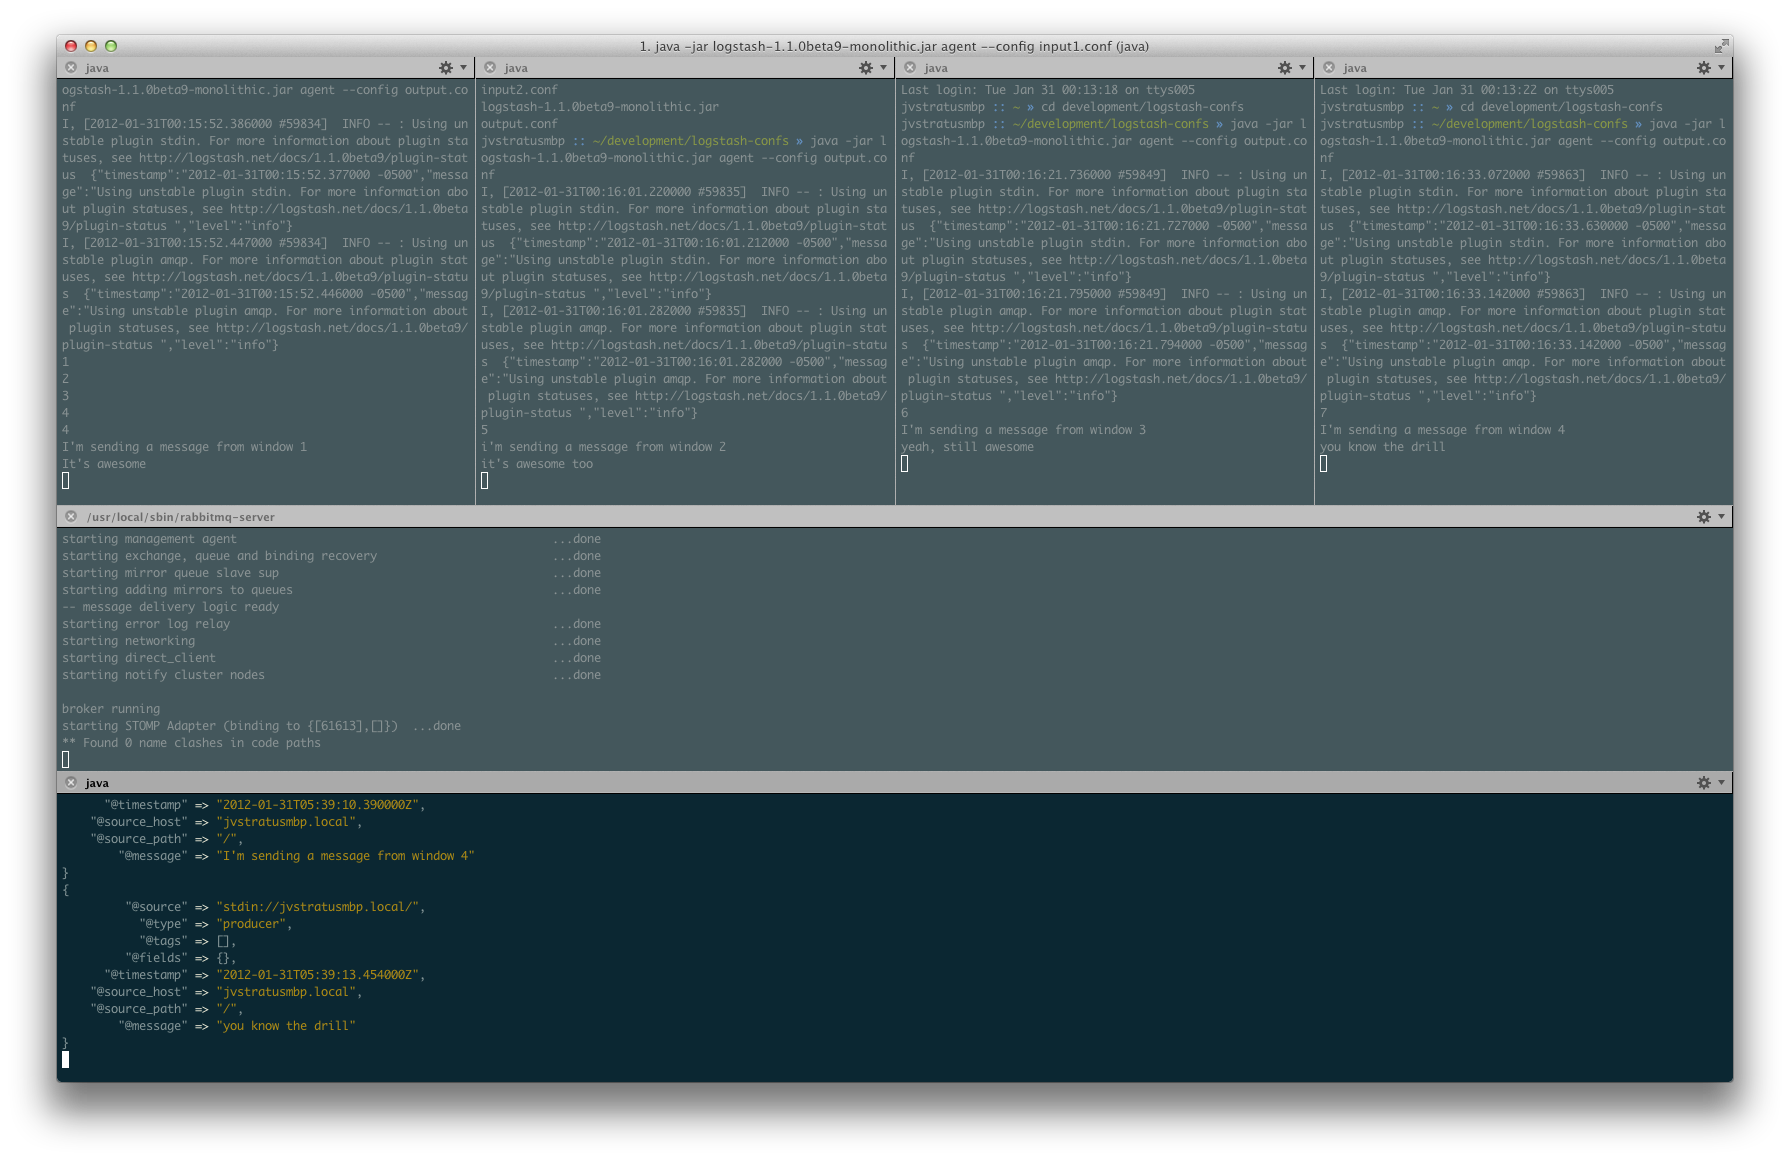
Yep, there they went. The last two messages you get should be the ones from window 4. This is another basic functionality of message queue software in general. Messages should be delivered in the order in which they were recieved.
One last diagram
Here’s a flowchart I created with Gliffy to show what the high-level overview of our setup would look like. Hope it helps and feel free to hit me up on freenode irc in the #logstash channel or on twitter.

This post will eventually make its way into the Logstash Cookbook Site.